|
We leave all of the honey in the hive. Though honeybees have honey within the hive, they may not be able to move from frame to frame to reach it when it's cold. Northern beekeepers know that from now until March, honeybees are at their highest risk of starvation. One insurance policy I use to make sure my bees make it through to spring is to place sugar cakes directly on top of their frames--a cold weather alternative to 50/50 sugar syrup. It’s much easier in cold temperatures for bees to move up rather than over to the next frame. When warmer temperatures arrive, they'll go back to their honey.
⚠️ No, this doesn’t risk harming the bees, but starvation does. Work quickly to install the rim spacer and sugar cake and you should be in and out in 60 seconds or less. If it was that jarring, the bees in the video would not leave the cluster and crawl up to the sugar. They would stay clustered. A hive can be full of honey but if temps are too cold, the cluster can’t move over to a new frame. They can starve in place. This is a practice conducted by many northern, well-experienced beekeepers. This concept will not apply to warm climate apiaries. ⚠️ Please research using alternative sugars to white sugar before deciding to do so. Though it's counterintuitive, other sugars may cause harm such as honeybee dysentery because of ash content. You can learn more from this well known beekeeper here. Ingredients 10 cups white sugar 2.5 cups water 1 tsp distilled white vinegar or apple cider vinegar Supplies candy thermometer bread loaf moulds* rim spacer Directions Combine all ingredients in a large stockpot over medium heat. Stir constantly until a simmer is reached. Insert candy thermometer. Continue to heat and stir until the thermometer reads 234°F. This will take a while so be patient, and continue to stir regularly. Once temperature is reached pour the sugar solution into the moulds. The sugar will continue to boil and breathe as it cools and hardens. Sugar cakes can be made in large batches, wrapped in parchment paper and stored in the refrigerator or in a cool dry place until use. *Sugar cakes are to be placed directly on the brood frames. I use a shim/spacer/rim spacer directly above my brood box to allow space for the sugar cake. Note the size in height of the spacer/shim you are using in your hive. Mine is about 2” tall. Ensure that the amount of sugar solution you pour into each mould will not be taller than the hive spacer and will still fit within the hive. My sugar cakes are just short of 2” tall within the moulds. I then place the inner cover above my spacer. 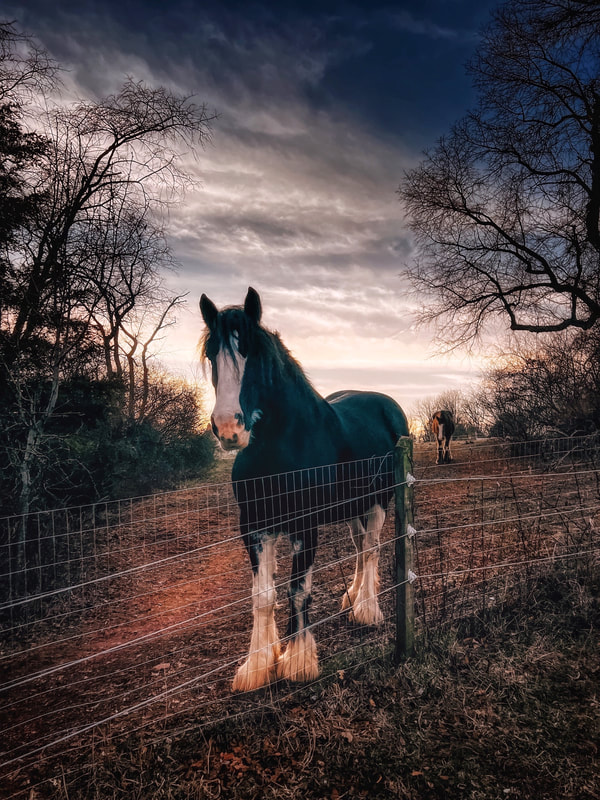 There are some well-known and successful permaculture farmers who believe draft horses do not belong in a permaculture system. I disagree. If cattle have a place, certainly do plough horses who offer more utility and function. Here’s why I believe draft horses make a great addition to a holistic farm: HUMAN BENEFIT: 1. One draft horse can pull 2000-8000lbs 2. Riding/transport 3. Meat in applicable countries 4. Gelatin/collagen in pharmaceuticals 5. Income from breeding, lessons, selling composted manure 6. Mowing by way of pasture grazing 7. Shed winter coat hair for paintbrushes LAND BENEFIT: 1. Manure is composted and returns nutrients to soil 2. Hoof prints make indentations in soil, creating seed and moisture collection pockets to help increase germination rates 3. Trampled cover crops during browsing return organic matter, nutrients and biomass to soil ECOSYSTEM BENEFIT: 1. Specie-specific parasite life cycles of sheep and goats are disrupted when horses rotationally graze same pastures 2. Sheep, goats, and foraging birds like ducks and chickens ingest parasites of the horse in return when rotationally grazing 3. Cover crops can be grown as forage for horses that also meet specific needs of the land (I.e. forage turnip for fodder abs to assist with soil compactions, etc.) 4. When allowed to openly graze, horses trim back overgrown growth such as Russian Olive while browsing. A detailed presentation I created for a permaculture course through Cornell is available as a video. You can see that in the video below. Building a strawberry cage cover is a super simple, easy and effective DIY winter gardening project. Get out in the garden (jn winter!) and protect future berries by fashioning a hinged lid to an existing raised bed. This is perfect for keeping birds out of the patch. If you have the luxury of starting a new patch, hardware cloth on the bottom of the new raised bed can prevent critters from digging underneath. An all-natural way to keep strawberries protected.
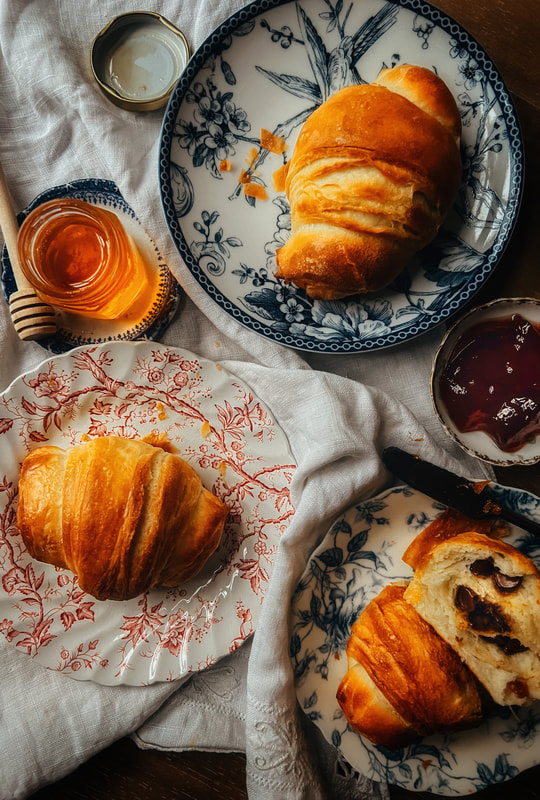 Here's the thing. Croissants are a waiting game. They're not hard to bake, they're just time consuming. But the from-scratch version is loads better than the kind you can buy pre-made in a tube and whack on the countertop to open. These croissants are flaky on the outside, and chewy on the inside. While they may not be perfect French pastries, they are certainly good enough for a homemade breakfast on a weekend morning. Recipe is for 8 butter croissants and 8 chocolate croissants. If you don't need 16 croissants, cut the recipe in half. The proportions still work just fine. Croissant Ingredients 1 teaspoon active dry yeast 320g warm water 440g pastry flour* 220g all purpose flour 60g sugar 400g butter, softened (plant-based or dairy) Dark chocolate chips (for chocolate croissants) Plant-Based Egg Wash Ingredients 1 tablespoon maple syrup 1/8 cup coconut or almond milk Standard Egg Wash Ingredients 1 tablespoon water 1 egg Directions 1. Combine water and sugar in the bowl of a stand mixer with a dough hook attachment. Whisk for a moment. Then sprinkle yeast on top. Whisk to mix slightly. Allow to rest to activate the yeast for five minutes. 2. Add flours to mixing bowl, 1 cup at a time, mixing between. There should be no dry dough. Next add 20g of softened butter. Mix. Cover and let rise 1.5-2 hours. 3. Remove dough and slice into 24 equal pieces. A kitchen scale is helpful here. Melt the butter in a microwave or over the stove top in a bowl and set aside. I use a pasta machine lasagna noodle attachment for the next step. You may also use a rolling pin on a lightly floured work surface. 4. Roll one piece of dough very thinly into a 10x20" (approximate) rectangle. Carefully move to a piece of parchment paper. This is the base layer. Brush the dough from edge to edge with the melted butter. Repeat this step, rolling out each slice of dough and applying butter between until you have stacked 12 sheets. Do not brush butter on the top of the last sheet. 5. Repeat step four with the remaining 12 pieces of dough. This will create our second stack of croissants. Cover with a dish towel and allow all croissants to rise for 2 hours. 6. Roll each stack of dough into 12x24" rectangle. We are working to remove some of the air. Next make three horizontal cuts along the shorter width of the rectangle. We should have four sections in each stack. 7. Slice each of the four rectangle sections once in a horizontal line across the middle. We now have 8 triangles per stack. 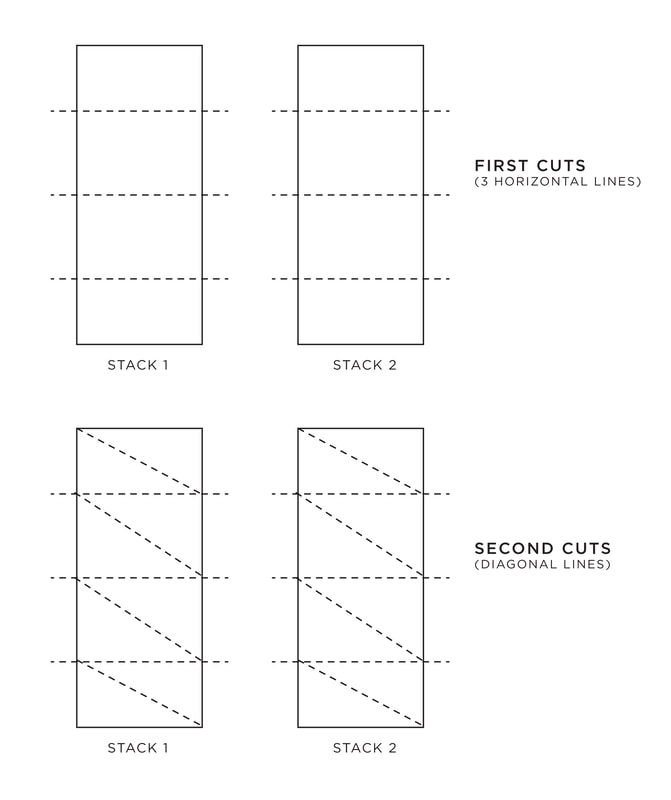 8. Line a baking sheet with parchment paper.
FOR BUTTER CROISSANTS: To roll the croissants start by taking one triangle. Start at the wide end and tightly roll towards the slender point. Tuck the point underneath the croissant and set croissant, point side down, on the baking sheet. Repeat for all triangles. FOR CHOCOLATE CROISSANTS: To roll the croissants start by taking one triangle. Place chocolate chips along the body of the triangle. I use about 10-12 chips per croissant. You can also melt the chocolate chips and brush onto the triangles before rolling. Start at the wide end and tightly roll towards the slender point. Tuck the point underneath the croissant and set croissant, point side down, on the baking sheet. Repeat for all triangles. 9. Cover the freshly rolled croissants with a towel and allow to rise 1.5 hours. You may also pause here and place the croissants in the refrigerator, allowing them to slow their rise and chill overnight. Cover with plastic wrap and chill for up to 12 hours if desired. 10. Heat the oven to 425 degrees Fahrenheit. Create the egg wash by combining the plant-based ingredients in a small bowl (or the standard egg wash ingredients in a small bowl). Whisk to combine the wash ingredients. Gently brush the egg wash on top of each of the croissants. Bake for ten minutes. Lower the oven to 375 degrees Fahrenheit. Cook for 8 minutes more. 11. Remove the croissants when they are golden brown. Allow to cool for 10 minutes before serving. To store the croissants, wrap in an airtight container and keep in the refrigerator. Stores for 24 hours. If you wish to store the croissants longer, freezing is recommended. *If pastry flour isn't available, you may substitute all purpose flour for this amount. Note that the texture of the pastry will be less flaky, and more dense... but still delicious. 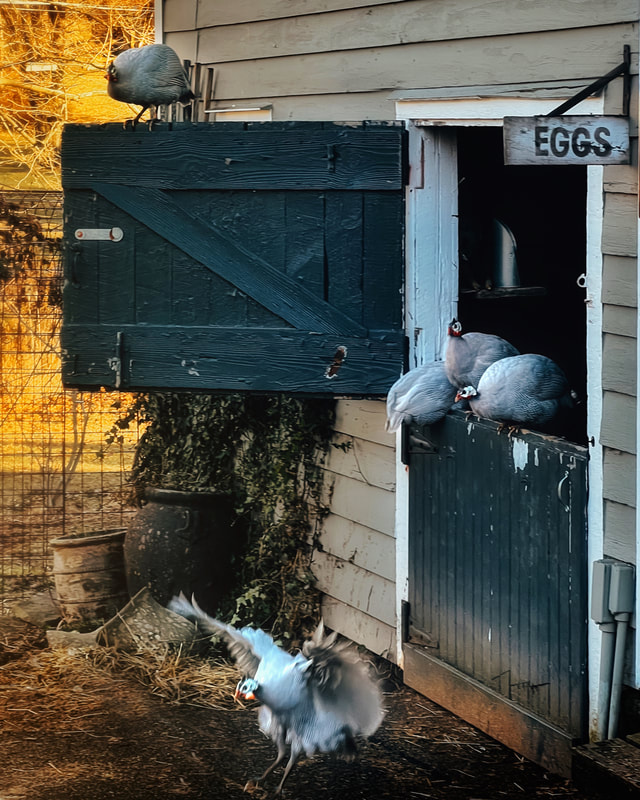 Answering some common Guinea Fowl questions today! If these are on your shopping list for spring, and you’re new to Guinea keeping, here’s some tips:
1. BREED // I have lavender guineas. I researched that they tend to be a quieter more relaxed breed. Compared to the white and helmeted breeds I’ve also had, I would say this is true. They’re not as high strung. 2. WANDERING // My guineas DO stay close to home, even when free ranging. I started them in a Guinea tractor my dad and I built. This allowed me to pass them through the entire property, keep them safe when young, and ensure all the ticky areas were grazed. After about three months in the tractor, they now get free range time. They know their home and don’t wander. 3. NOISE // Guinea fowl make noise, but no more so than our ducks and geese. What I didn’t expect was that they’d follow me everywhere all day, everyday. I have ten shadows now. They also tap on my windows when I go inside. #stalkers 🙄 4. FLOCK INTERMIXING // My guineas started in the tractor in the duck and goose field. They came to see the flock as non-threatening and are not territorial towards my other birds. 5. ROOSTING // The guineas are out 24/7 and roost in the trees above the ducks and geese by night. In inclement weather, I leave the barn door open and then go inside to roost if they prefer. 6. TICK REMOVAL // After a summer of Lymes for me and my dogs, I brought in guineas to remove ticks. Their presence has absolutely plummeted and we rarely find ticks now. WOULD I GET THEM AGAIN? In a heartbeat. Suspect worms in your flock? Sprinkle powdered cayenne pepper on top of your flock’s feed once per day, for three days. Can also be used weekly as a preventative. The cayenne powder burns away intestinal parasitic worms.
Old timers swear by this cheap and holistic approach to keeping their chickens healthy. Also safe for ducks, geese and guineas. I don’t have turkeys or other fowl so I haven’t tried it. Symptoms of infected birds may include: Low egg counts in spring, summer or other ideal laying conditions, weight loss, anemia, watery output and general poor health. Of course always consult a veterinarian as well if you have concerns. 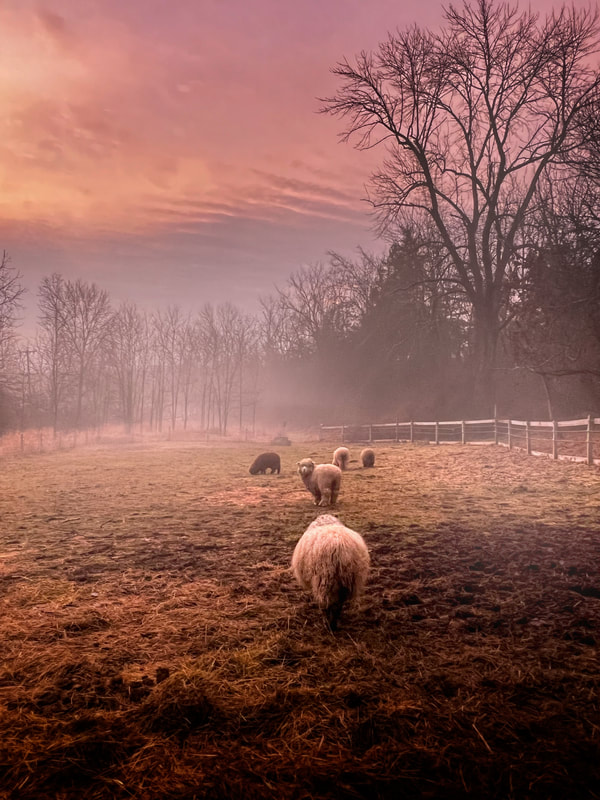 I am not afraid to try. This short sentence sums up how I have come to learn just about everything I have so far in homesteading. I experiment in the garden, telling myself it's not the end of the world if a crop doesn't work out. I owe it to my animals to learn all I can about their health and care and so I ask questions to my veterinarians and mentors. I taught myself to drive my Clydesdales by asking questions to folks who do, by skeptically watching hours of videos, and by following the lead of my horse who already knew how. It's through being present, observation, and just plain trying that I think a homesteader truly grows.
It has taken me a long time to find a sheep veterinarian to come to the farm. A lack thereof has made it nearly impossible to get the girls the routine exams and the vaccinations they need. Today, after finally finding someone who had time to take me on as a client, the girls are up to speed. This two-hour veterinarian appointment gave me a major crash course in sheep health. I learned several home remedies that scientifically work, I was taught to give vaccinations (I never knew how before!) and even vaccinated my own sheep under the supervision of my vet by the end of the appointment. When she had initially asked if I would like to learn I answered, "I would love to! I'm not afraid to try." Unfortunately and fortunately, I learned to treat and bandage a bad hoof. My girls passed their Famacha exams with flying colors! And I was able to share my belief and offer Finnegan as proof that interspecies pasture rotation really does cut down on parasitic worms. I think the vet could tell I was internally beating myself up a bit about the hoof infection; she consoled me by saying that many farms are struggling right now with the excess rainfall and moisture we've had in our area this winter. And acknowledged how difficult it is to get an appointment around here. It makes me all the more thankful I have my horses in pads and four shoes each, as surely abscesses would be present otherwise! When she asked if I would be comfortable continuing the care of the bandaged foot on my own, or if she should come back instead, I answered, "I'll try and I'll do my best! I can send you photos." I'm processing all the information I received, grateful to have found a sheep vet who took so much time for my girls and taught me so much. She was incredibly encouraging. I believe that learning through books and videos is a great way to gain insight; but there's nothing like a bit of time spent with a good mentor. I've now looked to experienced folks for assistance with horse training, care, sheep medicine, duck health, and beekeeping. Don't be afraid to find someone to help you! Most people in the homesteading and farming fields are happy to share their insight with a learning farmer. And when the opportunities come, don't be afraid to try. Hi. I'm Angela, the face, farmer, and content creator behind Axe & Root Homestead.
I’m asked all of the time about how I came to be a permaculture farmer and what my life entailed before now. Want to know my back story and how an artsy high school kid navigated their 20s and 30s and became a permaculture farmer? Here it is. Nice to meet you. 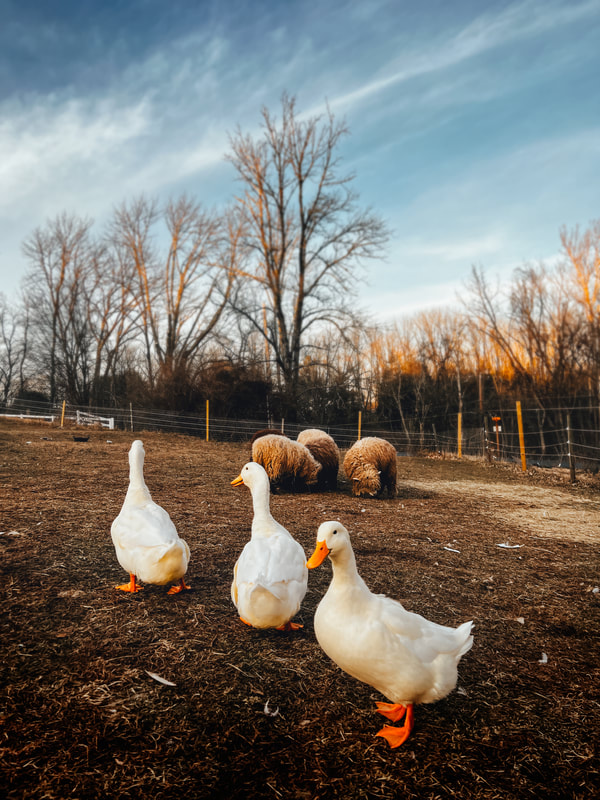 Pasture forage is officially dormant and deteriorated for the next two months. And it makes me bonkers! I hate exposed soil, it’s overgrazed, and terribly unhealthy looking in terms of soil protection. But I don’t believe in restricting animal movement for several months either as it’s poor for their health. So how does a permaculture farmer grapple with this unsightly situation for the next two months?
Number one, I have subdivided my pastures. Sacrifice areas go to hell while the animals move and exercise. The rest is quarantined and preserved as much as possible. Number two, bare soil in the sacrifice areas is regularly covered in scrap hay. It protects the topsoil, provides traction for the animals, and holds loads of seeds that’ll sprout come spring. Number three, I start cold season cover crop sowing first thing in March. Forage growth is reestablished asap. And number four, after years of observation on my pastures, I have two areas with soggy soil and even a little water that seems to flow downhill. Because these areas are well away from buildings, the septic, and pipelines, I’ll be planting two giant willow trees to help break up compacted clay, seek out and draw up a lot of that moisture, and help control mud in future seasons. If you have other ideas, I’d love to hear them! You can do this! Here’s my growing tips:
Sets vs. Seeds Onions can be grown from seed or from sets. Sets are onions that have already started and formed small bulbs. I’ve had success with both. Light Requirement Onions prefer 6-8 hours of sun per day. Location Plan for a spot with access to plenty of moisture as onions are slow drinkers. They do well in damp soil but need drainage… soaking wet feet leads to rotting bulbs. Onion Type Know your zone and onion type. Long day onion varieties are generally best suited for zones 6 and lower and require 14-16 hours of daylight. Short day onions need about 10 hours per day and work for zones 7+. Day neutral onion varieties are pretty adaptable with about 12 hours of sunlight needed daily. Ideally suited for zones 5 and 6. Choosing Storage Varieties If you’re planning on storing onions over the winter, grow storage varieties suited for long term keeping. My favorites are Aisla Craig for short term storage and Stuttgarter, Yellow Sweet Spanish, Patterson, and Yellow of Parma for long term. I’m not really a red onion person so can’t speak to that as much. 😉 When to Start Seeds are slow germinating and can be started in January with transplanting in spring into the garden. Other Onion Options Leeks, chives, Egyptian walking onions, ramps, and welsh onions are all great varieties to add to your must try growing list! Most of these are perennials too. Maintain Keep onions well weeded as they don’t like competitors. Companions Plan to grow onions alongside brassicas like broccoli, cauliflower, kale, and kohlrabi. They help to repel cabbage worms/moths with their strong scent when closely grown together. Greens, tomatoes and carrots are also good companions. So are fruit trees! Onions are great in guilds. Never plant onions near peas or beans, peanuts or groundnut, nor asparagus. They stunt one another’s growth. When to Harvest Harvest onions when they tell you to; their greens will usually fall over and begin to yellow. You can also see their papery skin above ground level on the bulb. |
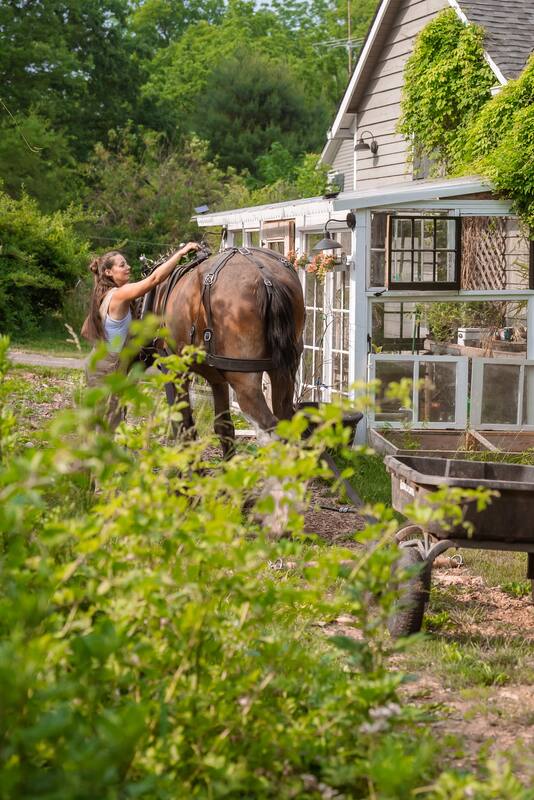
Angela is the farmer and content creator behind Axe & Root Homestead® LLC. This historic six-acre permaculture farm is home to two Clydesdale horses, ten honeybee hives, five sheep, two guardian dogs, barn cats and a flock of 40 geese and ducks. The farm produces maple syrup, fruit from a small orchard and loads of garden produce for consumption, preservation and donation to the local food pantry.
The Sustainable Homestead is available NOW!
Categories
All
|