 Honey sweetened/candied oranges are a healthier holiday sweet! I have such a sweet tooth and it’s so hard to not indulge in EVERY cookie I meet this time of year. So to keep in consistency with my passion for seasonal eating, I started making these honey orange slices. Someday, I’ll be making these from 100% homegrown citrus! For now I mix homegrown and store bought fruit with honey from my own hives. You can also dip these in dark chocolate for an added festive touch! Ingredients 12oz raw honey 12oz water 4 navel or Cara cara oranges, sliced Optional melted dark chocolate Directions Combine honey and water for a 1:1 syrup in a sauce pot. Bring to a boil and whisk to dissolve honey. Add orange slices and reduce to a simmer. Simmer, without stirring, for 45 minutes. Using tongs, place slices on a parchment paper lined baking sheet. Make sure they are not overlapping or touching. Chill in the refrigerator for 2 hours to set. Then either eat as is or dip in melted chocolate! 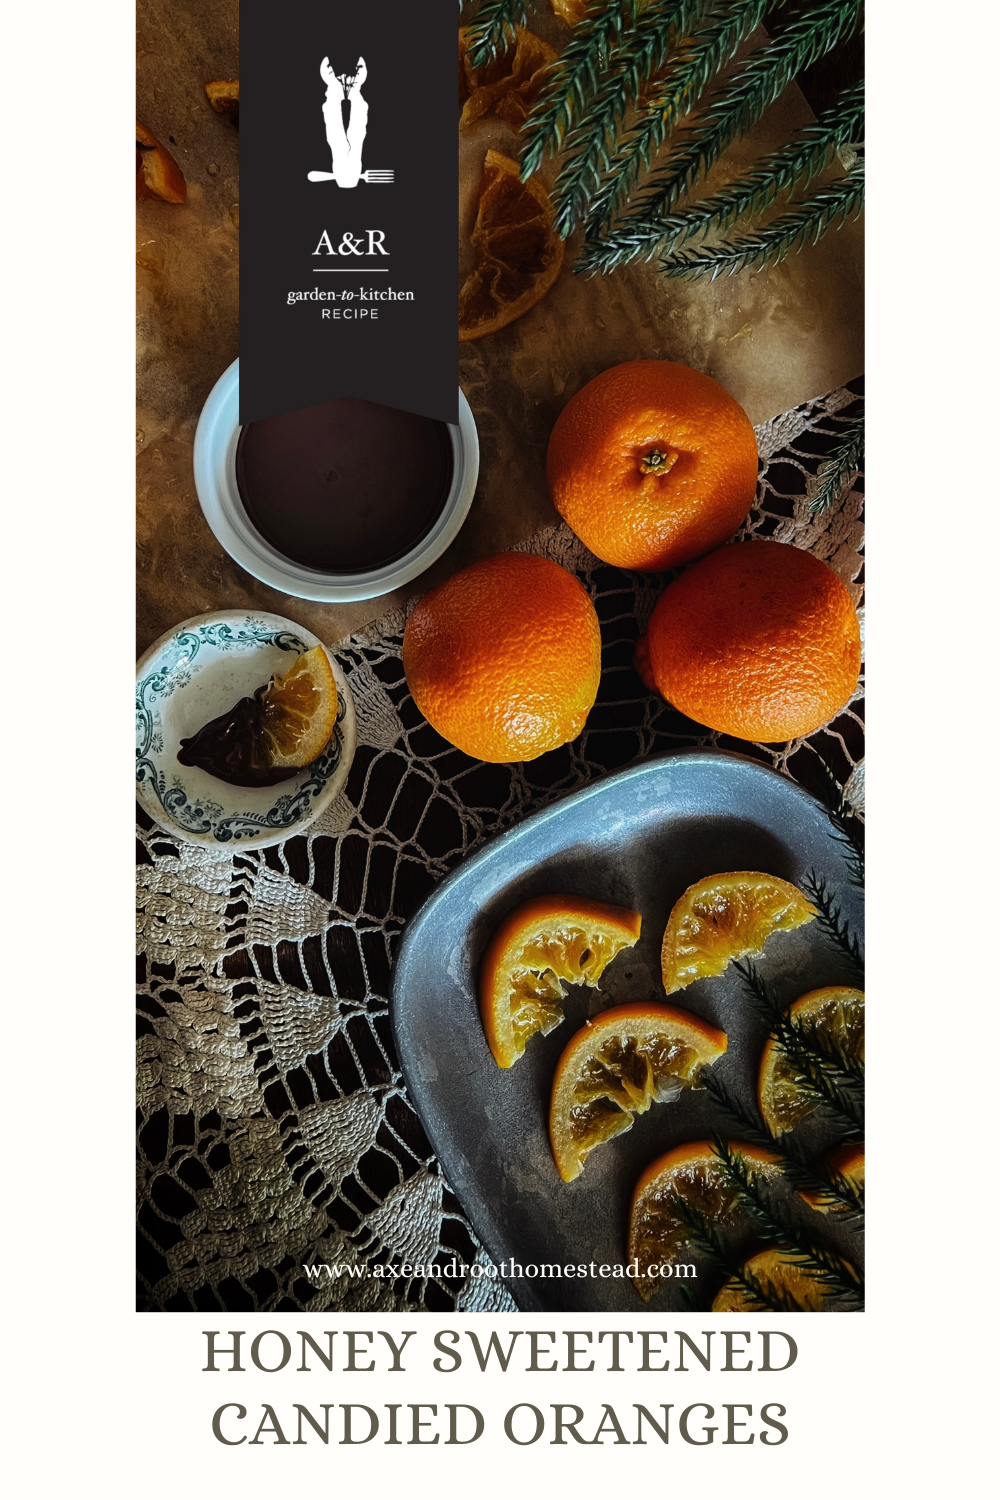
Sharing a refresher on how to compost. This time of year I’m heaping and tarping compost piles for spring planting. To successfully compost, 2/3 brown (carbon) or dry ingredients are required, with 1/3 green (nitrogen) or wet ingredients. A few notes:
1. I personally do not add additional moisture to my heaps since I live in a wet climate (central NJ). 2. I tarp my piles to activate hot composting. This breaks down the pile in as little as 4 months depending on the size and ingredients. Cold composting without a tarp can take 1 year or more. 3. When the right ratios are in place, compost should not smell. 4. Compost is great for adding organic matter to the soil. But it takes a while for solids to break down and become a liquid—the form plants require to absorb nutrients. Compost tea is a great way to feed plants immediately with the benefits of compost.
Beans are a low acid food. Therefore, they require pressure canning and not water bath canning. Low acid foods like beans must be heated to an extremely high temperature that is not possible to reach in a water bath method. This high temperature is what makes the beans shelf stable.
Homegrown (or store bought) black beans are easy to make, and very high in nutrients. For reference I can 32 pint jars from 5 pounds of dry black beans.
Directions Soak black beans in a large pot or bowl of water so that they are submerged by at least 1 inch. Soak for 12 to 24 hours before you intend to can. I use the cold pack method, which means after the beans have finished soaking, I drain them, rinse them and then spoon them directly into clean and sterilized mason jars. I leave 1/2 inch headspace and then pour non-chlorinated water over the beans so that they are submerged within the mason jars. Leave 1/4 inch head space. Carefully wipe clean the rims of the jars and add a new lid and affix with a ring. Screw to finger tight. I do not add salt to the beans. Load the pressure canner with the jarred beans according to your pressure canner guidelines. In addition to the water at the bottom of the pressure canner pot, I add 1 tablespoon of distilled white vinegar to keep the outsides of the jars from calcifying. Close the pressure canner, turn on the burner, and bring to a boil so that the pressure begins to rise. Close the steam valve according to your pressure canner guidelines and process the jars at 10 pounds of pressure for 75 minutes. After 75 minutes turn off the burner. Once the steam is no longer rising from the steam valve remove the 10 pounds of pressure setting to allow steam valve to fully open and for remaining steam to fully escape. Once there is no more steam escaping from the fully opened steam valve, remove the lid while standing back and using oven mits. Caution—steam is extremely hot. Allow jars to cool within the pot. Carefully remove the jars once cooled, one at a time, and place on top of a dish towel on the counter. Check that all of the lids are properly sealed by placing one finger in the center of the lid of each jar and then pressing down. If it fluctuates, then the jar was not properly sealed and can be re-processed. If the jar lid does not fluctuate, a proper seal has been made, and they may be stored out of sunlight, in a dark and cool location, such as a pantry or a cupboard. 
I grow spoon dipper and birdhouse gourds each season. I harvest them in the fall after the foliage has died back and dry them indoors, away from moisture. In the spring, the gourds should be very hard and the seeds should rattle around inside. I use a 1” drill bit and slowly drill a hole into one side of the gourd. I dump out the seeds—saving for planting—and my kids decorate them before we hang them in our trees.
HOW THIS BENEFITS YOUR GARDEN/ ORCHARD 1. Inviting birds to stick around all winter means they’ll be there already when bugs and pests make their first spring appearance. 2. Birds like sparrows love to snack on bag worms and coddling moth larvae. I hang these from my fruit trees to keep pests in check naturally. 3. When hung in your garden or growing spaces, birds are invited to stay and feed on cabbage worms, hornworms, and more. This simple effort gets kids involved in the garden, the orchard, and helps encourage native bird populations. You can find more activities similar to this one in my family seasonal living series called The Little Homesteader. Time Stamps: 0:25 My greenhouse goals / 0:43 Managing olives and citrus in the winter / 1:45 Tour of plants / 3:43 Insulating the greenhouse / 4:50 4 Ways to Heat Your Greenhouse Four ways to heat your greenhouse this winter season: 1. Greenhouse Grade Plastic I wrapped my entire greenhouse with hoophouse plastic to keep drafts away and hold heat within the structure. I literally wrapped the entire house with the plastic and affixed with a staple gun. I found mine here: Happybuy Greenhouse Film 15 x 40 2. Heater A heater is an obvious choice, especially on extremely cold days, however it quickly drains energy. If the greenhouse isn’t properly sealed or has drafts, any heat generated by the heater will rise and escape. Improperly attached extension cords can cause a fire. 3. Thermal Mass from Water Drums Large 50-gallon drums can be filled with water. Water loses heat more slowly than air. If plants are crowded around the drums, they will benefit from the atmospheric heat provided by the drum. In the spring, water from the drum can be used to water plants. 4. Reflective Insulation Board If you have a wall to spare, or can sacrifice the north side of your greenhouse, a large sheet of reflective insulation can be helpful. The insulation maintains heat within the greenhouse, while the mirror-like surface of the board captures and reflects light and heat from the sun back into the greenhouse. Other options include a composting floor, and erecting your greenhouse on the side of your home to take advantage of heat. Straw bales can form a perimeter at the base of the greenhouse, but just remember heat rises—if the roofline is not sealed, heat will escape. Finally, I paint my greenhouse interior black to attract the sun’s rays and hold heat.   It’s citrus season! I started a new batch of homemade limoncello! Have you ever tried it or made your own? It’s so easy and ions better than store bought. Limoncello is a sweet and tart liquor sipped after a meal in Italian culture. Because it contains so much lemon oil from the rinds, it truly does help with digestion. Careful… it’s easy to over-sip. 😉 The yellow color of the liquor comes from the lemons, but you could also use orange peel for a Halloween-themed drink! Recipe below: Limoncello Recipe 1 bottle 190 Proof Grain Alcohol (I use Everclear but vodka works too) 10 meyer lemons, organic 2 cups water 2 cups sugar or more to taste Directions Wash the lemons. Carefully peel the skin from each lemon using a vegetable peeler or pairing knife. Try to get only the yellow skin; the white pith adds a more bitter flavor. Place the skins in a large glass bottle. Pour grain alcohol over the top and close the jar. Allow to infuse for two weeks, undisturbed, out of direct sunlight. After two weeks, strain the alcohol into a new container and discard the rinds. They’ll be crispy! Prepare a simple syrup in a large sauce pot over medium heat by combining equal parts water and sugar. Whisk and allow the sugar to dissolve. Turn off the heat. Add the lemon liquor to the sauce pot and whisk to combine well. Taste the limoncello. If more sweetness is needed, mix a second batch of sugar syrup in a second sauce pot. Slowly add to the limoncello (1/2 cup at a time so as not to over sweeten). Once the limoncello is fully cooled, pour into glass bottles using a funnel. Screw the lid on the jars and store in the refrigerator for up to one month or the freezer for one year. To drink, simply pour liquor in a shot glass and sip after a meal.  Time Stamps: Sacrifice Plot 0:13 / Winter Pasture Management 1:44 / Pasture Division and Rotation 2:37 / Winter Seeding 4:21 / Sacrifice Rehabilitation 6:11 / Dry Lot 6:33 / Foggage 7:02
A well managed pasture is an integrated plan—a series of efforts working together to create a grazing space that doesn’t detract from Mother Nature through unnecessary carbon loss, tillage, compaction, and erosion. Rather, several initiatives can be implemented to maintain the integrity of pasture spaces year-round without sacrificing quality of life and forage on the part of the animal. In this video I’m sharing the several different efforts I make to keep four draft horses, five sheep, and a flock of ducks and geese thriving on my six-acre farm without ruining my land. Through winter pasture management, implementing dry and sacrifice plots, winter seeding, foggage or standing hay growth, and proper pasture division and rotation in the warmer months, we can continue to keep our animals healthy and happy while remaining ecologically sound. Several relevant content sources to support this video

Did you know that the peak production time for one strawberry plant is 1-3 years? After three seasons, productivity declines. This is why nature sends daughters, or duplicate plants of the mother, outward on shoots. These shoots are called runners. I take advantage of this system by letting my strawberries reproduce in place. But when healthy plants start spilling into walkways, I transplant these free plants to new beds and growing guilds. It’s so incredibly easy and fall is a great time to split.
Strawberry plants are incredible weed suppressors. When planted densely like in my blueberry and valerian guild in the first video, they remove the task of weeding, keep the soil cool, and help maintain moisture, all while providing fruit. And because folks always share their issues about pests taking their berries, I cage mine from birds with hardware cloth or netting when in production. A motion activated sprinkler does wonders too.
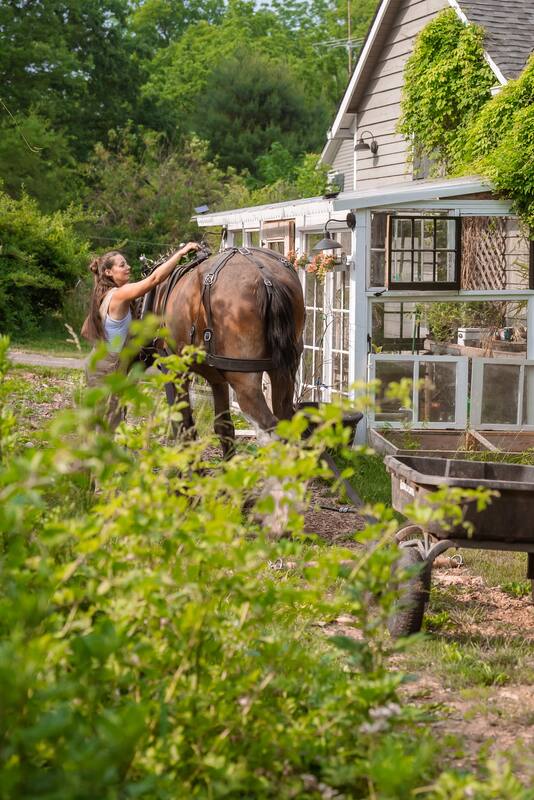
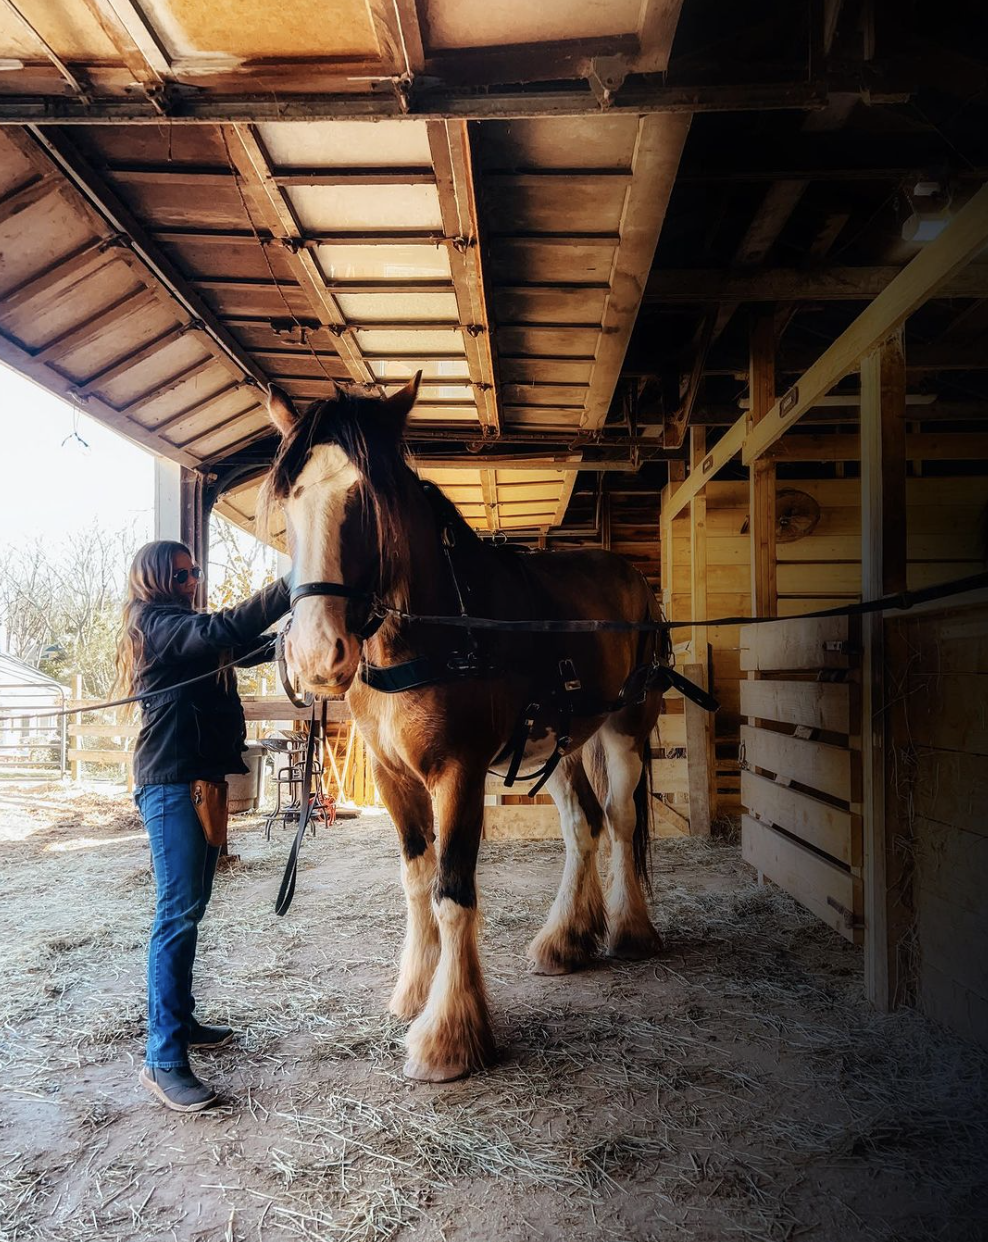 There are permaculture practitioners out there who speak out against the use of horses in permaculture. I disagree. Horses, when well managed like any other livestock, offer:
SOIL CONTRIBUTIONS - Manure is composted and nutrients are returned along with organic matter to soil - Hoof prints make indentations on top of soil creating pockets for improved seed germination - Trampled cover crops during browsing return nutrients and organic matter to soil ECOSYSTEM ROLE - Horses ingest parasites of sheep and other species while grazing, reducing parasitic larvae counts in sheep, goats, etc. - Pasture and forage maintenance is achieved through grazing. Well maintained pastures absorb tons of carbon from the atmosphere through regrowth and regeneration. - Horses love to graze autumn olive, both full grown or young shoots, removing invasive species FUNCTIONS - One horse can pull 2k-8k pounds depending on breed and health reducing need for tractors and fuel - Horses can provide transportation (leisure riding, sport or utility) - Meat in applicable countries - Income by way of breeding, teaching lessons, or selling composted manure - Shed winter coat hair can be collected and used to make paintbrushes You can learn more about horse breed options perfect for homesteaders (and other animal species and breeds that offer so much function) in my book The Sustainable Homestead, available wherever books are sold. This year I installed a Mediterranean guild home to olives, artichokes, rosemary, lavender and thyme. While I chose varieties most suitable to my climate, I’ve researched artichoke winter care and here’s what I’m installing. We are getting our first freeze this evening (these plants have successfully withstood frosts already) so it’s time to hibernate these artichokes for the season.
I start by tying the leaves of the artichoke plant together in a bundle. This protects the crown. After tying, I cut the leaves off just above the string or twine. The remaining standing bundle is roughly 6-8" in height. I choose to mulch the surrounding soil and other guild members with the trimmed artichoke leaves. I also add chopped comfrey leaves as a green manure at this time along with fallen maple, oak, or other dried leaves from around the farm. An upside pot is affixed on the artichoke bundle for protection from the elements. To secure the pot in place over the winter months, I top the pot with a rock. Bedding or mulch can be added around the base of the pot to make sure gaps are filled in where the pot makes contact with the soil. Imperial Artichokes can withstand frosts so once winter temperatures begin to ease and we head back into the spring season, I'll be removing the protective pot. From there the bundles will be untied and new growth will be allowed to emerge. |
Angela is the farmer and content creator behind Axe & Root Homestead® LLC. This historic six-acre permaculture farm is home to two Clydesdale horses, ten honeybee hives, five sheep, two guardian dogs, barn cats and a flock of 40 geese and ducks. The farm produces maple syrup, fruit from a small orchard and loads of garden produce for consumption, preservation and donation to the local food pantry.
The Sustainable Homestead is available NOW!
Categories
All
|